
Bulletproofing a car is a five-step process that begins with threat assessment and ends with ballistic acceptance testing. It's not a simple upgrade—it's a complete engineering rebuild where ballistic glass, body armor, and run-flat mobility systems must work as one integrated protection package. The build timeline ranges from 8–14 weeks depending on protection level and vehicle platform, and every step has specific quality gates that separate legitimate conversions from installations that leave gaps.
This guide walks you through the real process buyers follow, grounded in the actual specifications and materials that define modern vehicle armoring.
Step 1: Define the Threat
The single most expensive mistake in vehicle armoring is choosing the wrong protection level. Buyers often arrive at armoring shops wanting "maximum protection"—which translates to maximum cost and maximum daily usability penalty. The correct approach is to start with a concrete threat profile.
Ask yourself these questions:
Where do you operate? If you work in a stable urban environment (developed country, low crime rate), you face sporadic crime threats. Handgun-level protection is statistically sufficient. If you operate in a region with armed conflict history, organized crime activity, or frequent carjackings, rifle-level protection is justified.
What is the nature of the threat? Handgun attacks account for approximately 85% of civilian vehicle crime in high-risk regions like South Africa and Latin America. Rifle attacks are typically limited to active conflict zones, high-value cargo transport, or diplomatic protection scenarios. Few civilian security situations require protection beyond rifle-level threats.
What level of immobility can you accept? B4 (handgun) protection adds 250–300 kg to a mid-size SUV and reduces fuel economy by 8–15%. B6 (rifle) protection adds 600–700 kg and reduces fuel economy by 15–25%. The weight penalty directly affects handling, acceleration, and braking distance. If your vehicle will be used for daily commuting, B4 is practical. If you require escape mobility in a genuine ambush scenario, B6 becomes necessary—and the operational penalty is steep.
What is your budget reality? B4 conversions on a Toyota Fortuner or Land Cruiser typically cost 30–40% less than B6 on the same platform. Overspecifying protection level creates cost, weight, and operational problems that outweigh the marginal security benefit in low-threat environments.
Buyers who skip this step—arriving with a predetermined protection level—frequently end up with systems that are either over-engineered for their threat profile or installed on vehicles that cannot safely carry the weight.
Step 2: Choose the Protection Level
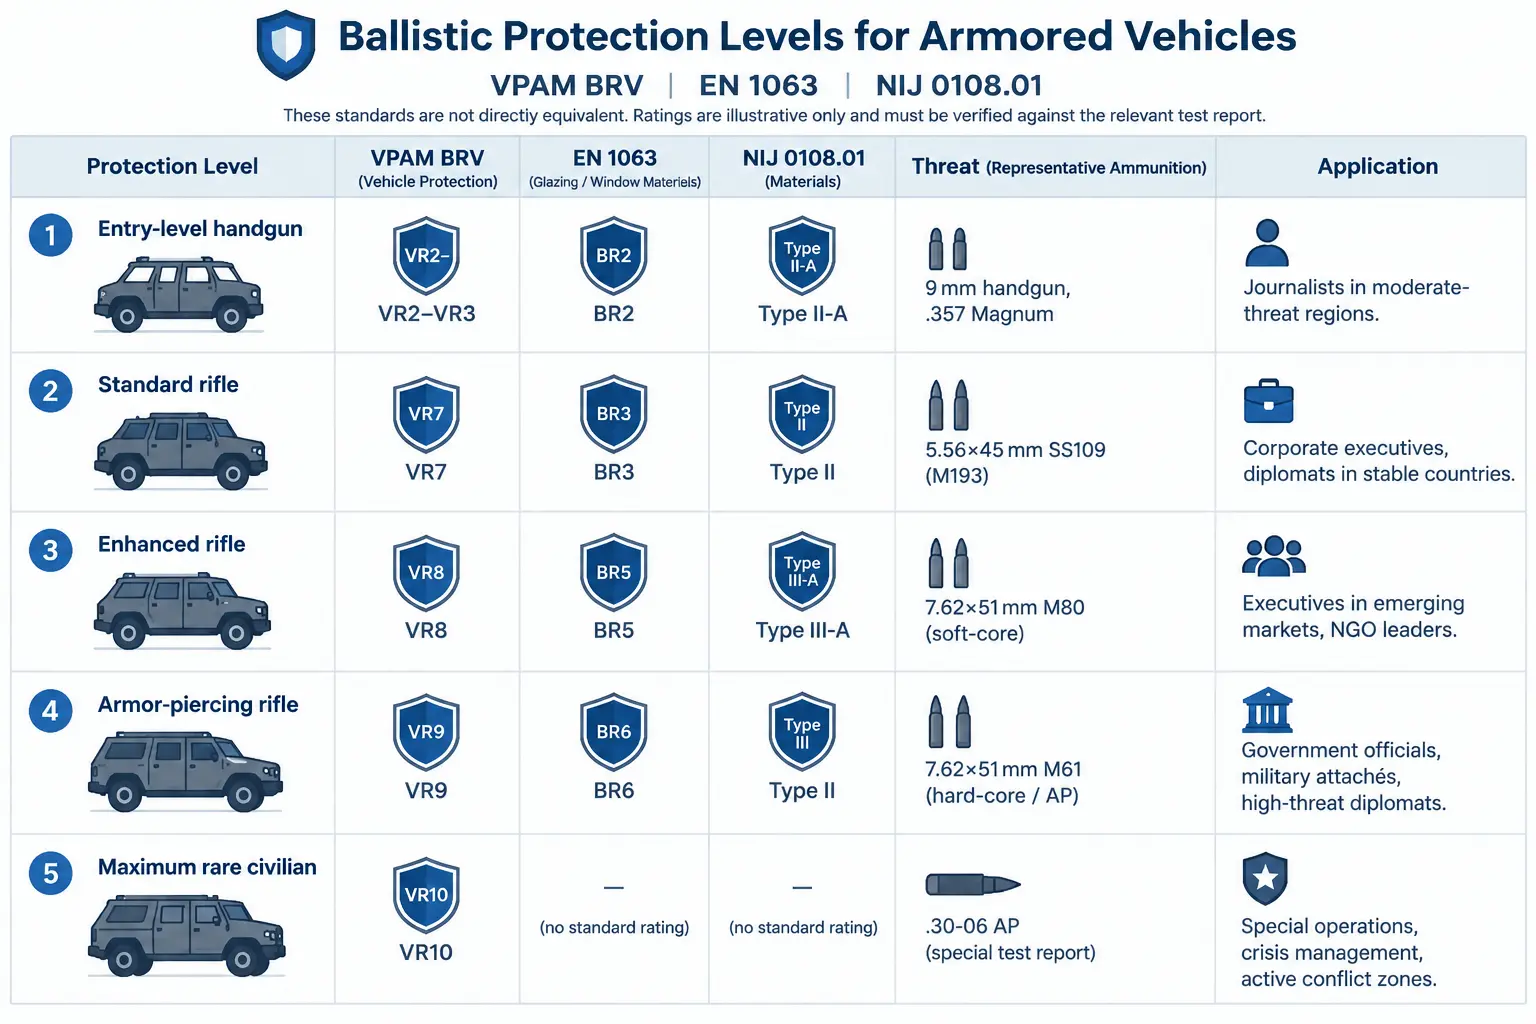
Vehicle armor is classified using the EN 1063 standard (European) or NIJ 0108 (United States). Both use numerical ratings; EN 1063 is the more rigorous framework and is the global standard for civilian armoring.
BR4 / Handgun Level: Stops 9 mm Parabellum, .357 Magnum, and .44 Magnum at point-blank range. Requires 18–24 mm ballistic glass. BR4 remains the practical baseline for most civilian applications because it preserves vehicle usability while covering the vast majority of realistic threats.
BallisticBuddy's third-party test report (FDCL-3B-25-BB-I) confirms that 25 mm handgun-level ballistic glass maintains 81.3% optical clarity while stopping 9 mm rounds reliably. This means you retain nearly normal visibility—critical for daily driving and escape situations where the driver must see clearly to navigate.
BR6 / Rifle Level: Stops 5.56×45 mm NATO (M16/AR-15) and 7.62×51 mm (G3/AK-47) soft-core ammunition. Requires 36–42 mm ballistic glass. BR6 is deployed when the threat model includes coordinated rifle fire or military-grade weaponry.
BallisticBuddy's test report (FDCL-4B-36-BB) documents that 36 mm rifle-level glass stops 7.62 mm steel-core ammunition with no spall (rear-face shatter) and retains 78.9% light transmission. This 2–4% visibility loss compared to BR4 becomes noticeable at night and in poor visibility—a real operational constraint for vehicles operating in high-risk regions where escape often happens in low-light conditions.
For elite threat scenarios, thicker 43 mm BR6+ glass (FDCL-5B-43-BB-I) maintains 82.4% transmission, proving that increased thickness does not always mean proportional visibility loss if the material stack is engineered correctly.
BR7 and Beyond: Requires 55–80 mm glass and structural steel plating to stop armor-piercing rifle rounds. Reserved for military, law enforcement, or extreme-threat VIP scenarios. Not practical for civilian daily use—doors become mechanically difficult to operate, window operation is severely restricted, fuel economy collapses 25–35%, and the vehicle handles like an armored personnel carrier.
Protection Level | Threat Profile | Glass Thickness | Fuel Penalty | Weight Penalty | Practical For |
|---|---|---|---|---|---|
BR4 (Handgun) | 9 mm, .357, .44 Magnum | 20–25 mm | 8–15% | 250–300 kg | Urban executives, cash transport, moderate-threat regions |
BR5 (Light Rifle) | 5.56 mm NATO soft-core | 31–35 mm | 12–18% | 400–500 kg | High-profile transport, diplomatic vehicles |
BR6 (Rifle) | 7.62 mm NATO, AK-47 soft-core | 36–42 mm | 15–25% | 600–700 kg | Active conflict regions, high-value cargo, security escorts |
BR7 (Armor-Piercing) | 7.62 mm steel-core, AP rounds | 55–80 mm | 25–35% | 800+ kg | Military, law enforcement only |
Step 3: Glass, Body, and Mobility as One System
This is where most buyers' understanding breaks down. Ballistic glass is not a standalone component—it is the core of an integrated protection system that must work with run-flat tires and body armor simultaneously.
Ballistic Glass: The Core Component
Ballistic glass is manufactured from multiple layers of float glass laminated with polyvinyl butyrate (PVB) or polycarbonate interlayers. When a bullet strikes, the glass layers fracture in a controlled pattern—energy is absorbed across the laminate stack instead of penetrating through a single hard surface.
The thickness progression is not linear. A 25 mm handgun-level pane weighs approximately 54 kg/m². A 36 mm rifle-level pane weighs roughly 92 kg/m²—only 70% thicker but handling 3–4x the energy. This is why glass selection has such an outsized impact on the overall weight budget and suspension requirements.
During installation, ballistic glass requires:
- Specialized urethane adhesives rated for 3–7x standard glass weight (50–80 W power window motors are upgraded to 150–200 W to handle the extra load)
- Heavy-duty hinges reinforced for 2–3x door weight
- Modified door check straps to prevent violent swing or slam
- Precise sealing against moisture intrusion (poor sealing causes delamination within 2–3 years)
Glass installation accounts for 40–50% of total turnaround time because curvature, thermal stress during curing, and sealing precision are unforgiving. A single installation error—misaligned laminate layers, improper adhesive cure temperature, or moisture intrusion—creates a visible distortion or thermal stress fracture that fails ballistic testing.
Body Armor: Creating the Ballistic Capsule
Once glass is specified, the body structure receives reinforcement. The goal is to create a 360° protective capsule around the passenger compartment.
Door panels are fabricated from aramid fiber (Kevlar) layers glued to the inner door structure, or ballistic steel plates welded to the door frame, depending on protection level. B4 doors typically use aramid; B6 doors shift to steel because Kevlar alone cannot reliably stop rifle rounds.
Pillar reinforcement (A, B, C pillars) uses welded steel plates or bolted composite panels to prevent bullet penetration through the vehicle's main structural points. The firewall—the vertical barrier between the engine compartment and the passenger cabin—is a frequent vulnerability. Poorly executed firewall protection leaves a ballistic gap even though the rest of the vehicle is hardened.
Floor armor protects against roadside IEDs and underbody threats. Roof panels are typically lighter composite material (since most attacks come horizontally) unless the vehicle operates in active-fire urban environments.
Run-Flat Tires: The Escape System
Ballistic glass and body armor can stop bullets, but if the tires are disabled, the vehicle becomes immobile—the exact moment escape is most critical.
Run-flat systems for armored vehicles use hard composite inserts bolted inside the wheel, beneath the tire. Under normal conditions, the tire carries the vehicle on air as usual. If the tire is punctured or destroyed by gunfire, the vehicle's full weight transfers to the insert ring, which becomes a load-bearing surface the wheel can roll on.
According to international standards (FINABEL A.20.A, NATO/TÜV), armored vehicles equipped with run-flat inserts can travel 50–100 km after complete tire depressurization—depending on the insert system and road conditions. This is not indefinite driving; it is escape distance. A vehicle hit in an ambush can clear the threat zone at controlled speed, reach a checkpoint, or reach a secured facility without stopping to change tires.
Run-flat inserts are load-rated to support the heavier armored weight. A standard passenger car's factory run-flat tire (which uses reinforced sidewalls) is insufficient for armored vehicle weight—the sidewall collapses. Hard inserts provide predictable mobility even after catastrophic tire damage.
Vehicles without run-flat systems that suffer tire damage in hostile environments become static targets. Vehicles with run-flat systems retain mobility and driver control—the difference between escape and ambush.
Step 4: Verify the Supplier (Test Reports, Not Marketing)
This step separates professional armoring from DIY or compromised installations. Before committing to a supplier, demand verifiable ballistic test documentation.
What to Ask For
Independent ballistic test reports. Reputable armoring firms provide third-party test certificates from accredited laboratories. BallisticBuddy's test reports (FDCL series) are examples of transparent documentation: they specify the exact glass thickness, the test ammunition (caliber, velocity, impact energy), the number of shots, and pass/fail results.
Do not accept marketing claims without supporting test data. "This glass stops a .44 Magnum" is marketing. "This 25 mm glass was tested per EN 1063 BR4 with 9 mm, .357, and .44 Magnum ammunition and showed no penetration at 5 meters" is verifiable specification.
Vehicle-specific engineering documentation. Ask the shop to provide:
- Weight calculations (armor weight vs. GVWR headroom)
- Suspension upgrade specifications (spring rate, shock type, load rating)
- Brake upgrade specifications (rotor size, caliper type, pad material)
- Door hinge reinforcement details
- Electrical system upgrades (alternator amperage, wiring gauge)
This documentation proves the shop has engineered the conversion, not simply bolted components onto the vehicle. DIY armoring shops skip these calculations—a red flag.
Ballistic testing of the completed vehicle. After installation, the vehicle should undergo live-fire testing by an independent ballistic range. The range fires 28+ rounds per protection zone (typically 8 zones on the passenger compartment). The test protocol is standardized: three shots per zone spaced 120 mm apart to assess performance after the first impact damages the glass.
Failure rates are <1% when installed by certified shops. The vehicles that fail typically have installation defects (glass not fully seated, adhesive curing incomplete, sealing gaps) that are caught and corrected before the customer receives the vehicle.
Component supply chain transparency. Ask the supplier where ballistic glass is sourced. BallisticBuddy supplies purpose-engineered ballistic glass and run-flat tire components to armoring firms; component specifications and test reports are available for review.
Avoid shops sourcing generic "ballistic glass" from unknown suppliers—the material stack and performance characteristics are unverified.
Step 5: Installation and Acceptance Testing
The installation process is a complete disassembly and rebuild that typically unfolds in overlapping phases.
Phase 1: Vehicle Disassembly and Engineering (2–4 weeks)
The entire interior is stripped. Seats, trim panels, wiring, carpet, and instrument cluster are removed. The vehicle is 3D scanned to create digital templates for every surface that will receive armor. Finite-element analysis is run on the chassis to confirm that added mass does not exceed GVWR and that stress points (door hinges, suspension mounts, firewall) can handle new loads.
This phase is critical and time-consuming because errors discovered here are trivial to fix; errors discovered during installation are expensive. A shop that rushes this phase is a red flag.
Phase 2: Armor Component Manufacturing (2–4 weeks, parallel)
Ballistic glass is ordered to OEM spec—exact curvature, heating elements, antenna integration, tint. Door panels are cut and layered (Kevlar for B4, steel for B6). Window-lift motors are upgraded. Heavy-duty hinges are sourced or fabricated.
Phase 3: Installation and Integration (2–3 weeks)
Doors are opened to receive ballistic materials. Kevlar or steel is bonded/welded into cavities. Ballistic glass is fitted—this is the most time-sensitive step because thermal stress during urethane adhesive curing can trigger cracking or delamination. Once glass is set, interior panels are refitted (modified because they must fit around thicker window perimeters). Run-flat inserts are installed in wheel wells.
Phase 4: Quality Testing and Acceptance (1–2 weeks)
Rain-seal testing confirms no water intrusion around new glass seals. A 300+ km road test checks for rattles, squeaks, and systems interference. If certification is required, the vehicle is sent to an independent ballistic test range.
For conversions verified against EN 1063 standards, proper installation results in zero penetrations into the passenger cell across all tested zones. The test protocol allows up to three penetrations before failure; modern certified shops rarely exceed one penetration per 100 conversions.
Real-World Adjustment
Armoring firms frequently discover late in the build that electrical harnesses or mechanical linkages cannot be fully protected without compromising vehicle function. The firewall is the frequent culprit—protecting it completely can interfere with engine cooling or throttle linkage. Engineering then selects the next-best coverage option, which is why certified vehicles may have 95–98% coverage rather than 100%. This is not failure; it is reality-based engineering. The test protocol allows this, and coverage of 95%+ against a full threat still represents genuine protection.
FAQ: Cost / Timeframe / What Changes in the Vehicle
Q: How much does a bulletproof conversion cost?
A: B4 (handgun) on a mid-size SUV or sedan typically ranges $40,000–$70,000 USD equivalent. B6 (rifle) ranges $100,000–$200,000 USD equivalent. The 200–250% cost differential reflects not just material cost but structural upgrades (suspension, hinges, brakes), ballistic steel welding, and extended engineering validation. Regional labor rates, vehicle complexity, and platform-specific engineering add 20–40% to these estimates. Exact prices vary significantly by region due to currency fluctuation and labor costs.
Q: How long does a bulletproof conversion take?
A: Plan for 8–14 weeks total. B4 conversions on vehicles the shop has armored multiple times take 8–10 weeks. B6 conversions, or first-time platforms, take 10–14 weeks. Aluminum-bodied vehicles add 2–4 weeks because they require specialist composite engineering instead of standard steel welding. Turnaround is fastest (6–8 weeks) for vehicles the shop has armored repeatedly; first-time platforms add 4–6 weeks of design and fixture fabrication.
Q: What happens to fuel economy?
A: B4 conversion reduces fuel economy by 8–15%. B6 conversion reduces it by 15–25%. This is not speculative—it reflects the actual weight penalty of armor. A mid-size SUV at 1,800 kg baseline becomes 2,050–2,100 kg with B4 armor (11–17% heavier). The engine must work harder; fuel consumption increases proportionally. No upgrade mitigates this penalty because the mass is real.
Q: Can I still open my windows?
A: Partially, yes—with restrictions. At B4 level, the driver's door window typically lowers 150–200 mm—enough for toll booths, security gates, and casual interaction. Passenger windows may lower slightly. At B6 level, window operation is severely restricted (often 100–150 mm) because 36–42 mm glass is so thick that mechanical interference occurs at full extension. Many B6 conversions have passenger windows that do not open at all.
Q: Will my warranty be voided?
A: Yes, if the conversion weight exceeds your vehicle's GVWR. Manufacturers will not cover drivetrain, suspension, or brake failures once the vehicle is armored and that added mass is documented. This is non-negotiable. Some OEM-approved armoring partnerships (like Volvo's factory programs) preserve warranty for the armored portion, but aftermarket conversions do not.
Q: Can I still use my vehicle normally?
A: With B4 protection, yes—daily commuting is practical. Acceleration is slightly sluggish; braking requires a bit more distance; city driving feels normal because speeds are low. With B6 protection, daily use is feasible but noticeably compromised—highway performance is visibly slower, cornering feels heavier, and fuel economy is substantially worse. Many B6 vehicle owners report that city driving feels normal but highway performance is "like driving a heavy truck."
Q: What if I sell the vehicle later?
A: Resale is possible at a discount. B4-armored vehicles retain 60–75% of conversion cost. B6 retains 40–60%. The discount reflects reduced appeal (niche market), higher insurance, fuel economy penalty, and perceived specialized use. A full disclosure of the conversion, complete test reports, and maintenance history improve resale prospects. Some buyers specifically seek armored vehicles for security; niche buyers do exist—but you will not recover the full conversion investment.
Q: Is the glass distortion-free?
A: Modern ballistic glass, when properly laminated, is nearly distortion-free. BallisticBuddy test reports confirm that 25 mm handgun-level glass maintains 81.3% optical clarity; rifle-level 36–43 mm glass retains 78.9%–82.4% clarity. The main difference is a subtle color shift and reduced brightness at night. This is not the "thick fishbowl effect" of older armor; it is subtle. However, if lamination is poor or interlayers are misaligned, double vision and distortion become severe—another reason to verify third-party test data before committing.
Next Steps: Component Selection and Professional Guidance
For organizations and individuals requiring ballistic protection, BallisticBuddy supplies purpose-designed ballistic glass and run-flat tire components engineered to integrate into standard armoring conversions. Ballistic glass is available in handgun-level (BR4, 20–25 mm) and rifle-level (BR6, 36–43 mm) specifications, each independently certified to EN 1063 standards and tested by accredited ballistic laboratories.
If you are evaluating an armoring project, request BallisticBuddy test samples or engineering consultation to confirm that the protection level and component specifications align with your threat assessment and vehicle platform. Third-party test documentation provides transparent, reproducible ballistic performance data—critical for decision-making in security-sensitive applications.
For a comprehensive guide to the civilian vehicle armoring landscape, threat assessment frameworks, and component integration strategy, visit our Civilian Vehicle Armoring Guide.
Sources
ArmoredMobility.co.za, 2024: How to Bulletproof Your Car: A Step-by-Step Guide
Trust Auto, 2022: How to Bulletproof Your Car
INKAS Armored Vehicles: Our Process
Armormax, 2026: How to Bulletproof a Car Safely
Exec Armor, 2026: Run-Flat Tires for Armored Vehicles: How They Work
RunFlat International: Security Armoured Vehicles
SchutzCarr: Bulletproof Tires & Run-Flat Systems
Mahindra Armored: Run-Flat System
AAT Armour Tech: Run Flat Tyres for Armoured Vehicles
Land Rover Media: Range Rover Sentinel
EN 1063 Wikipedia: Security Glazing Standard
NASG: Curved and Flat Transparent Armor Ballistic Table
VASGLASS: Bullet-Resistant Glazing
DriveClick.cy, 2026: Bulletproof Car Guide: Cost, Protection Levels & Best Models
Hall, Harper, & Snelling, 1998: Bullet Resistant Glazings for Automotive Vehicles